Shooting precision Airguns is fun. You can do it in the basement especially using the trap below. More on the joys of airguns soon.
You can download a shooting target I am working on named Tic-Tac-Toe-Target. Players mark the square by shooting it. The better squares (like the center) are smaller targets.
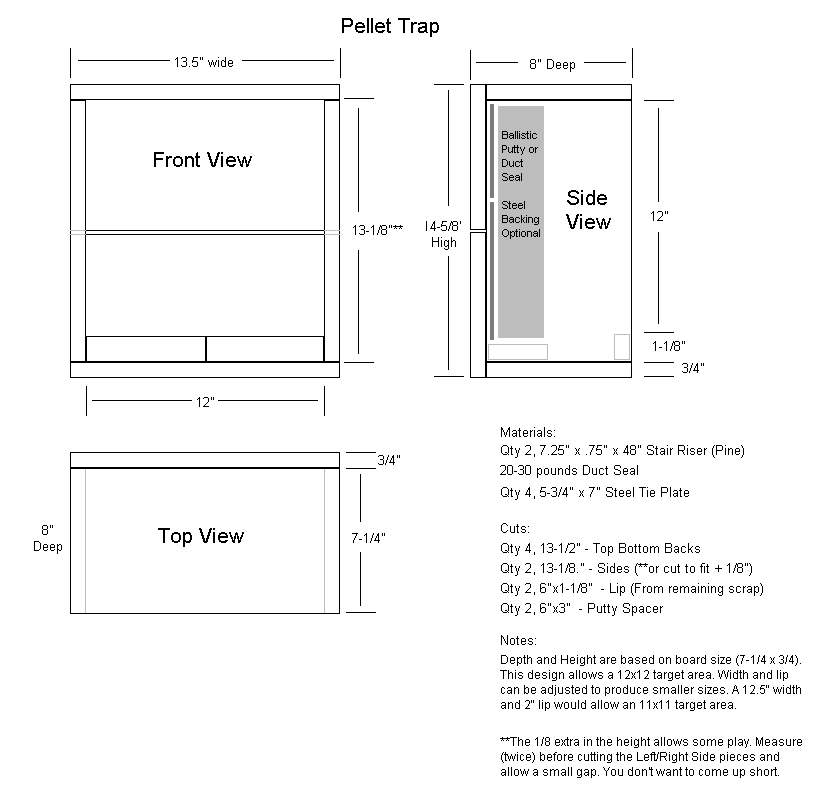
My trap design is based on the JP Craig Trap so be sure to view his pictures, drawings and instructions. I have my own drawing below. I increased the size to 14.5" tall x 13.5" wide x 8.75" deep to allow a 12"x12" target area and inside depth of 8". I wanted to be able to shoot 8.5"x11" targets in portrait or landscape (11" across) orientation. I also changed JP's design in the way the boards overlap to allow for more depth and easier assembly. My side, top and bottom boards sit in front of the back boards. The bottom/top are full length.
My trap is more the size of the Baby MD Improved AR5/10 Trap which is 14"x11"x8". View that page too before you start. It has complete instructions for building your own version of his trap and some good tips and information. Consider buying the BabyMD trap, the price and quality look excellent to me! My trap is a simpler build design. His construction techniques look like something Norm Abrahms would do on the New Yankee Workshop. Check out the Joe Matusic Airgun Main Page for buying his trap and other airgun and trap info.
For material I used Pine Stair Risers. The size of 7-1/4" x 3/4" x 48" worked well for the size trap I wanted. Two boards would make a 14-1/2" high trap. These are very high quality boards, milled very square, straight, tight grain, denser then regular pine. They cost me $14 so I spent an extra $9 over regular pine but I like the results a lot. (You can also get Oak for $24.) The precision of these boards made it easy to get a nice square result. Home Depot has an isle section of all stair parts in the lumber department. To protect the back wood from pellets I used Steel Tie Plates that are normally used to nail boards together. These were easy to fit in and only $4 total for 20ga steel. You'll find those in the lumber department too.
I bought Gardner Bender (GB) duct seal from ElectricalDeals.com for $1.50/lb plus shipping of $6 per order. This is the same stuff Home Depot and Menards sell. I bought it in 5 pound plugs which measured 10.5"x3.25"x2". That should help you decide how much you need. I put in 20 pounds and got a 2" inch thick 12"x12" area.
I am getting 1" penetration from a .20 R9 shooting a 14.3gr CP 625 fps; and 1.25" penetration from a .22 Raider PCP shooting a 14.3gr CP 800 fps. So I am not really satisfied and would like to find some denser duct seal.. I would like to be able to handle a higher power PCP (like a Career) without hitting the steel. I may just add 10 more pounds (for 3" depth) of GB since it is cheap and easy to get. Note that my Beeman P3 Pistol that shoots a .177 7.7gr Laser Pellet about 400 fps penetrates just the depth of the pellet.
BabyMD tells me he is only getting 1/3" to 1/2" penetration with a .177 850 FPS pellet. The Baby MD Trap page has a chart from the Beeman trap showing expected penetration. He uses O-Z/Gedney DUX Seal, but I have not been able to find it. They have an 800 number on the website and will find you a local agent.
There is also Bridgeport brand which is available at local electrical supply houses and is $3/lb. They have an agent listing online. The agent can find you a seller. There is also http://www.idealindustries.com. I have not tried either of these.
The trap height of 14.5" and depth of 8.75" are fixed to the board size of 7-1/4" x 3/4". You can vary the width to be anything you want. By increasing the Lip height you can reduce the size of the vertical target area, then add more filler wood to reduce the amount of Duct Seal. I guess you could vary the height pretty easily by ripping one of the back boards to less then 7-1/4", or inserting more. I bought a clip at an Office store and screwed it to the top to make it easy to put up a target. Another option would be to put 1/4" rubber behind the steel plates to better absorb a pellet hitting them..
I like the way my trap came out. It was easy to build and could be done with a hand saw. I probably should have bought the BabyMD trap and been done with a phone call. But I wanted a bigger trap that I could hang Portrait or Landscape letter size targets on. You could even use A4 (8.3"x11.7") size paper. The 12"x12" target area allows me to print my own targets right to the edge of the paper and have a little room to miss. My trap sits at the end of 36 feet of crawl space so making less trips to change targets was desirable. I also thought I would use a few of the power tools I have laying around. If you have any comments please email me airgun_at_carlbarnes.com (replace _at_ with @).
For some targets for your new trap check out these links:
If you are going to print your own targets Joe Matusic recommends (and I concur) using recycled cream colored heavy (24-28#) desktop publishing paper. Your targets will look more like the real thing and you'll get cleaner holes.
Copyright (c)2002 Carl T. Barnes